Last Update: Apr 16
ZetaChain is a decentralized blockchain and smart contract platform designed to be interoperable with networks that support the integration of disparate networks into a single ecosystem.
They launched a 90-day farming of their points, and we have a chance to get second crypto airdrop for this activity. The costs are pennies and the drops can be satisfying! Everyone should do this, even if they didn’t get the first drop.
You need at least 2 ZETA to perform all activities. Token can be obtained at CEX or just swap BNB to ZETA via cross chain bridge.
At the beginning of the campaign, it was very glitchy. And it was too difficult to do. Now the team has fixed everything and everything works relatively comfortably. You only need to complete tasks once a week, which is quite convenient. Given that they require minimal costs to complete. That’s why I recommend everyone to do them.
Let’s start
Note: Sometimes Metamask failed transactions in Zetachain due huge activity. In this case try to import your wallet into OKX Wallet. It works better on my experience with Zetachain.
1) Fund your Zeta token to your wallet from CEX like OKX or Bybit on bridge from other network.
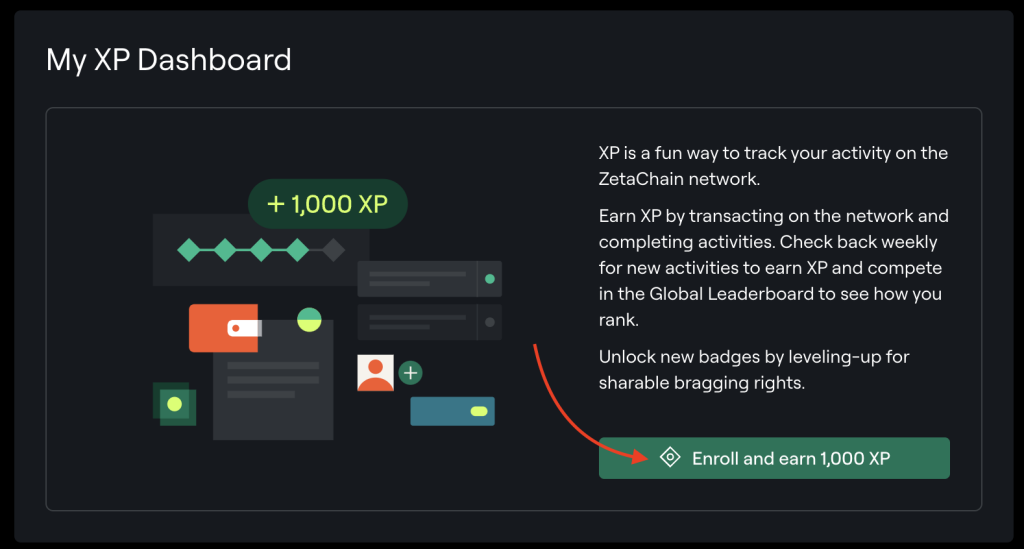
1) Go to the website and click “Connect Wallet” select Metamask and Sign wallet connection to platform.
2) Click “Enroll and earn 1,000 XP” (works only if you entered to website using invite link) to receive 1000 bonus XP on start and sign transaction in your wallet.
3) Then click the “Continue” button on the banner several times
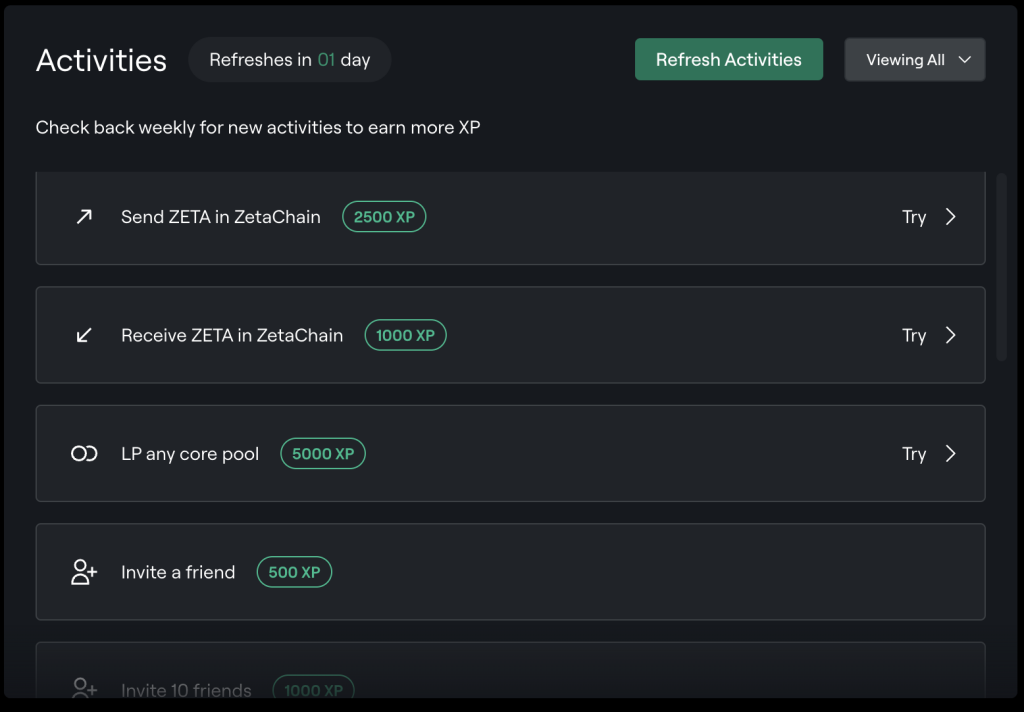
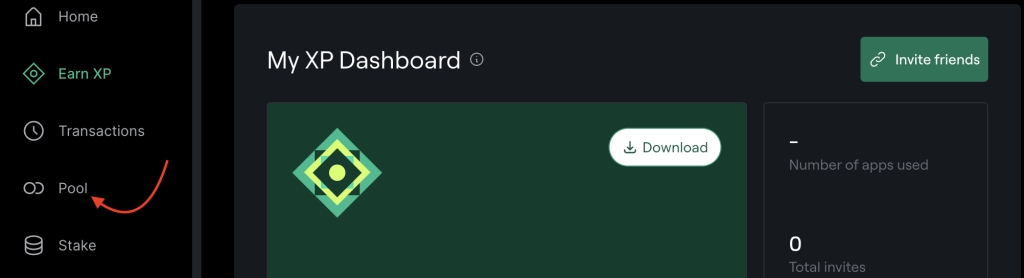
4) Now after entering, go here and scroll down to Activities section, that is your work zone
Now we will accomplish two tasks at once, because they are interconnected.
Send ZETA in ZetaChain and Receive ZETA in ZetaChain (Task 1-2)
1) Create new wallet
To quickly accomplish this task, create a new wallet in Metamask (be sure to save the passphrase). The wallets will be linked to each other, so I recommend that you do not use the newly created wallet to perform activities in other projects, only to interact with your linked wallet.
2) Send 0.01 – 0.005 Zeta to the newly created wallet (It’s need for the first time. Reduce to 0.001-0.0005 for subsequent times). Needed to pay the transaction fee.
3) Send 0.0001 Zeta from newly created wallet to main.
That’s all what we need to do for this two tasks. If you want, you can check completion by clicking on green “Refresh Activities” button.
Perform 4 Swaps on ZetaSwap
Tip: Sometimes transactions on Zetaswap fail. In this case, you need to either re-enter the site using OKX wallet (by importing your wallet there) or increase the Slippage Tolerance. In the second case, click on the gear on the form and raise the percentage to 5-6% in the field, then click on the field behind the form to close it. And click on the rounded arrow next to it to update the quota and click the “Swap” button
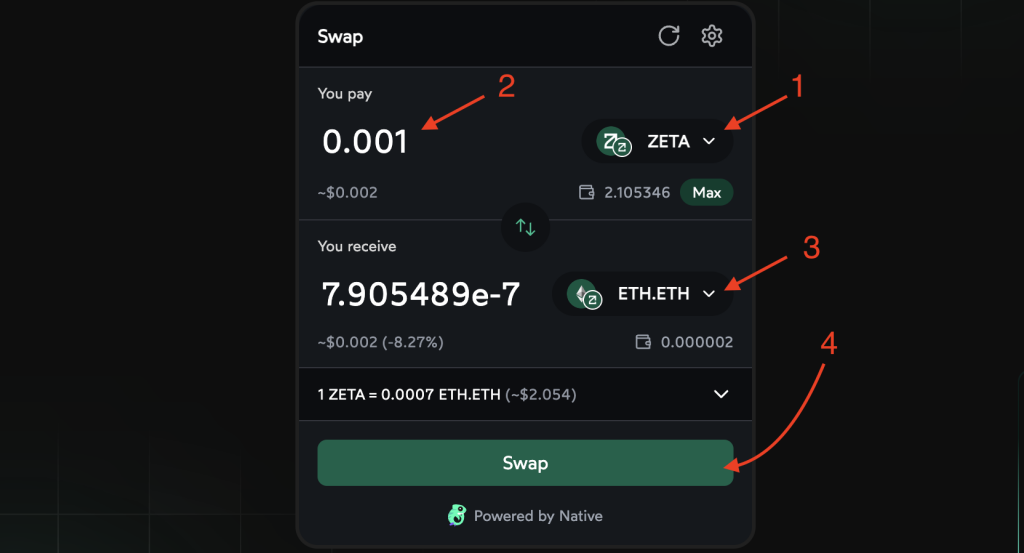
Receive ETH in ZetaChain (Task 3)
- Go to ZetaSwap
- In “You pay” section select “Zeta” and input 0.001
- In “You receive” section select “ETH.ETH”
- Click “Swap” then “Confirm Swap” and “Confirm” transaction in Metamask
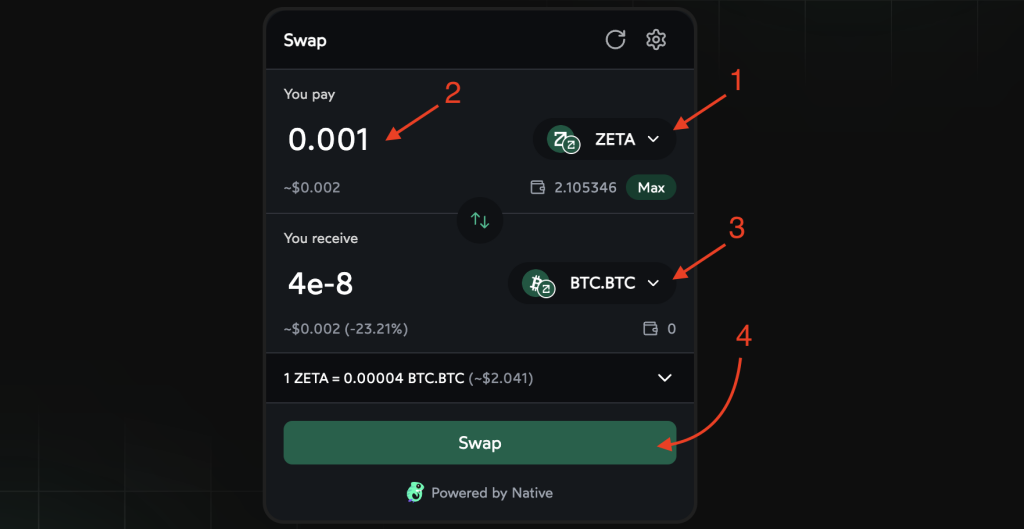
Receive BTC in ZetaChain (Task 4)
- Continue to use ZetaSwap
- In “You pay” section select “Zeta” and input 0.001
- In “You receive” section select “BTC.BTC”
- Click “Swap” then “Confirm Swap” and “Confirm” transaction in Metamask
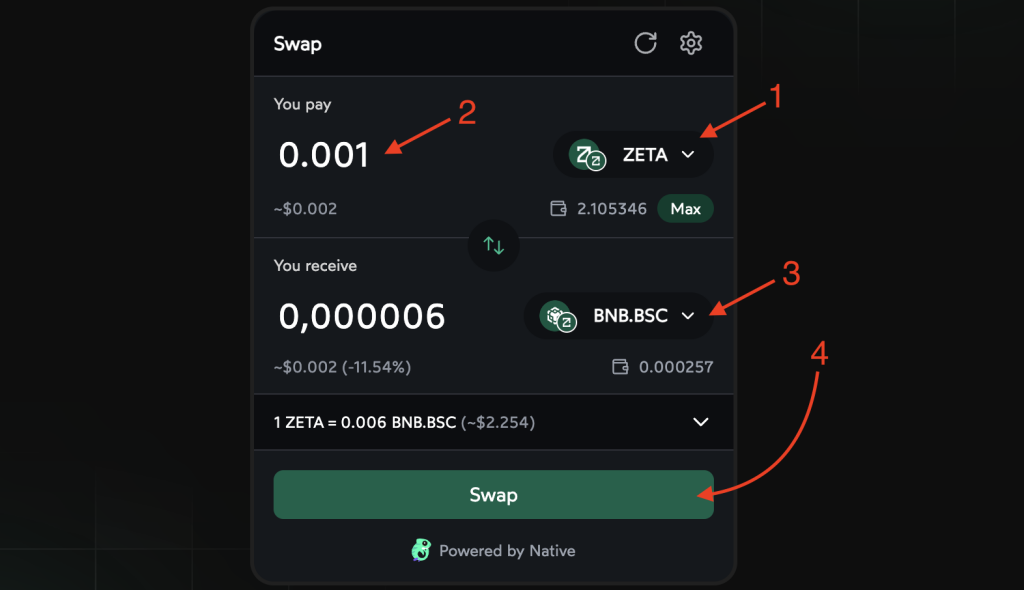
Receive BNB in ZetaChain (Task 5)
- And finally on ZetaSwap
- Set on “You pay” section select “Zeta” and input 0.001
- Set on “You receive” section select “BNB.BSC”
- Click “Swap” then “Confirm Swap” and “Confirm” transaction in Metamask
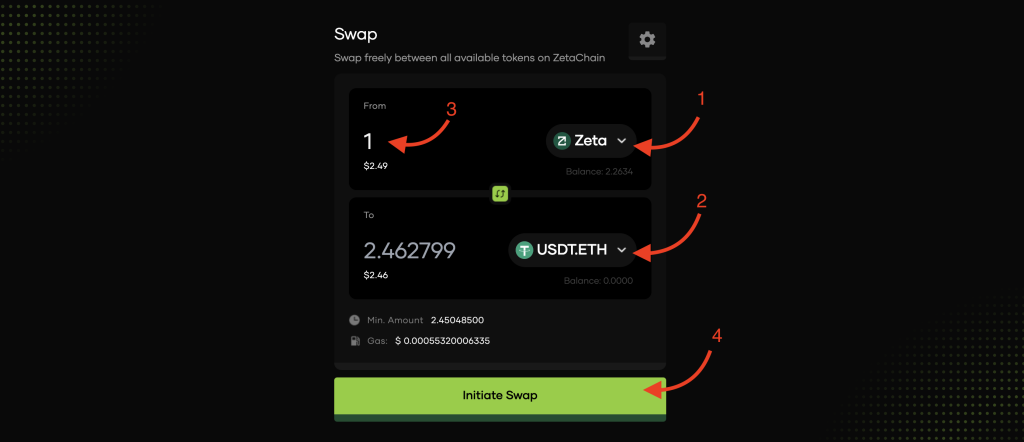
Swap any tokens on Eddy Finance (Task 6)
Update: Minimal swap amount incresed from $2 to $5
Important! Finish this quest before Range Protocol quest. This token required to add liquidity.
1) Go to Eddy Finance
2) Select in “From” section “Zeta” token and input 1 Zeta
3) In “To” select “USDT.ETH” token
4) And click “Initiate Swap” and “Confirm” transaction in wallet
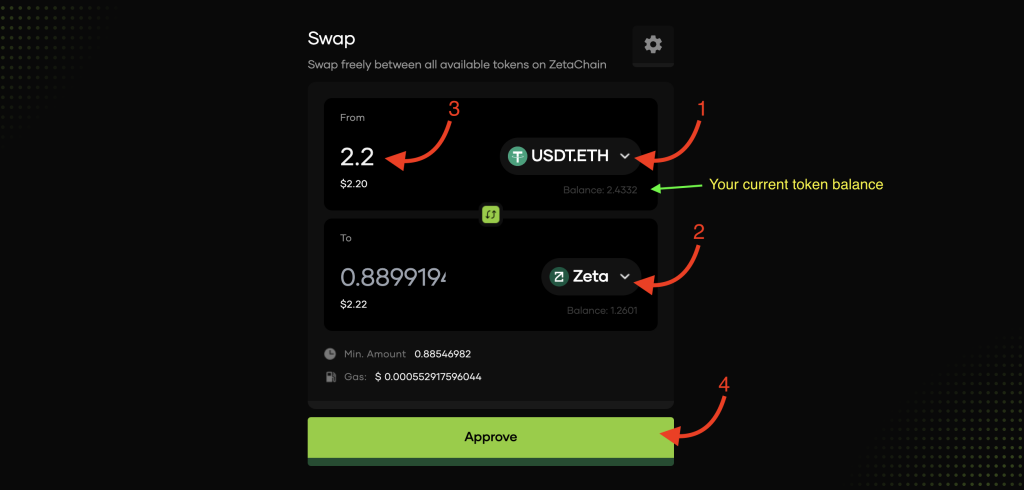
5) Now in the next week we make a reverse transaction, or you can swap immediately back in the Zeta to avoid becoming a hostage to the token’s volatility. But be sure to leave some of the USDT.ETH token for the next task on Range Protocol (amount on your choice). I left some extra.
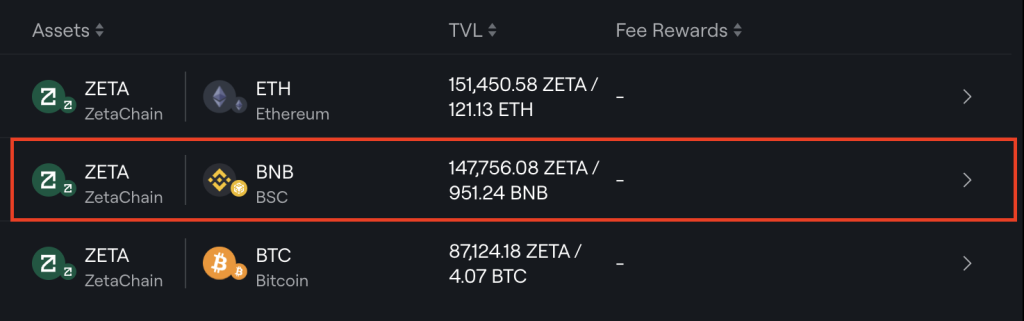
LP any Core Pool (Task 7)
1) Click on “Pool” menu item or follow the link.
2) Click on Zeta / BNB pool in the list
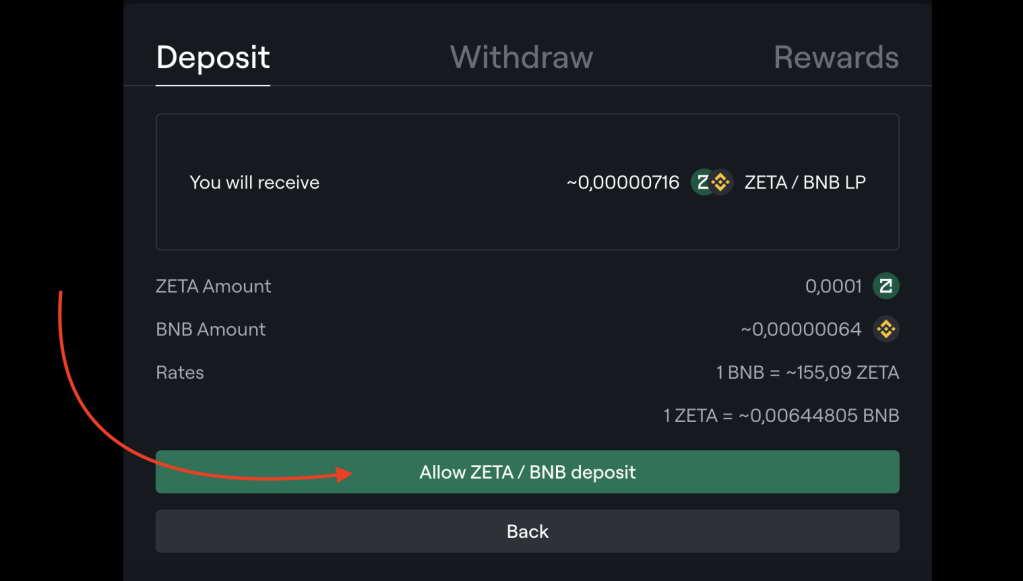
3) Input 0.0001 Zeta and click “Review deposit”

4) Click “Allow Zeta / BNB deposit” button
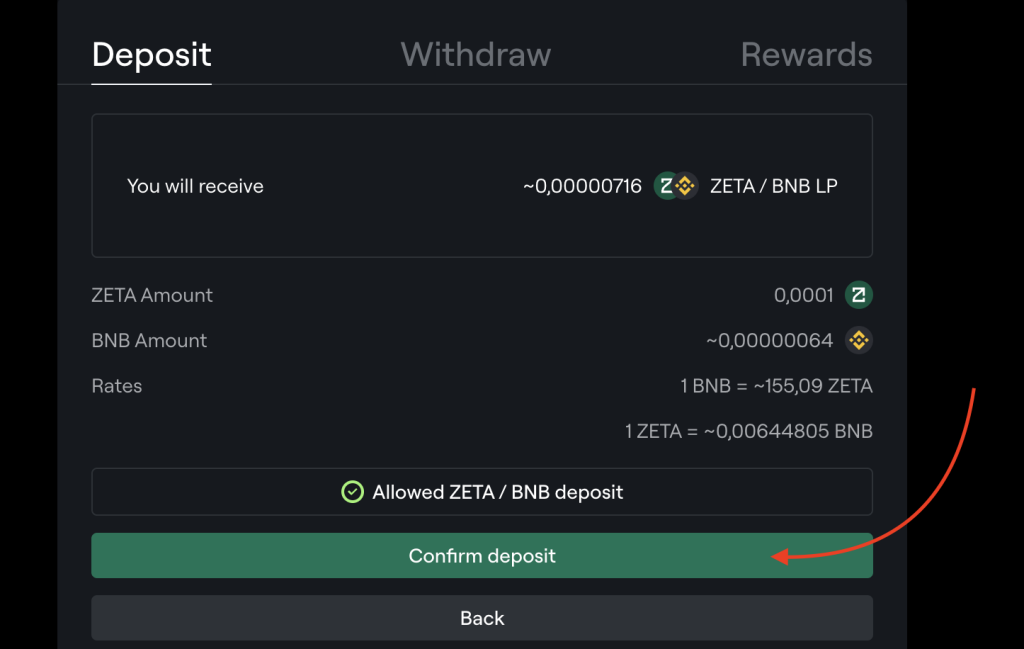
5) Click “Confirm deposit” button and “Confirm” transaction in your wallet. Sometimes transaction failed, you need to try 1-2 more times.
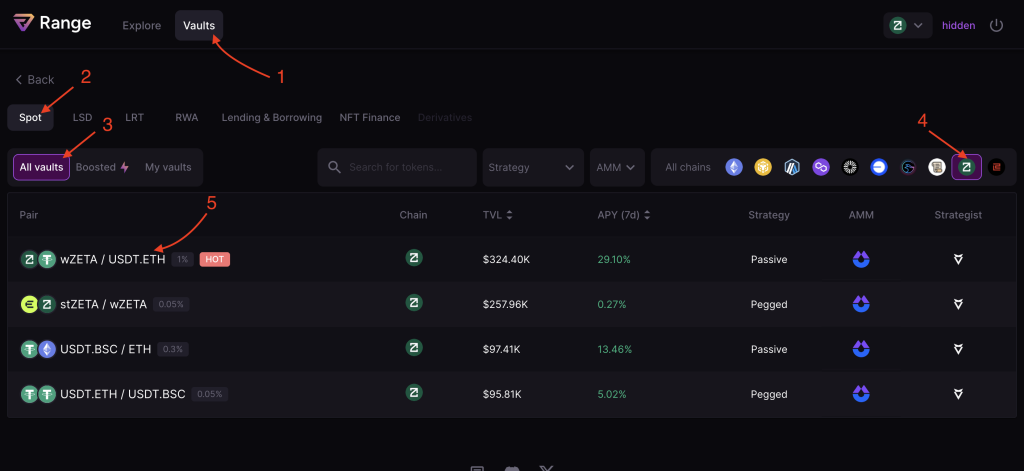
Add liquidity to a ZetaChain Vault on Range (Task 8)
1) Go to Range Protocol by this link
2) Click “Connect” button on top right corner, and click on Metamask
3) Check all points from the attachment below to make similar and click on “wZETA / USDT.ETH” row
4) Make “Use ZETA” checkbox checked
5) Enter 0.0005 in the Zeta field
6) Click on “Wrap And Add Liquidity” button and “Confirm” transaction
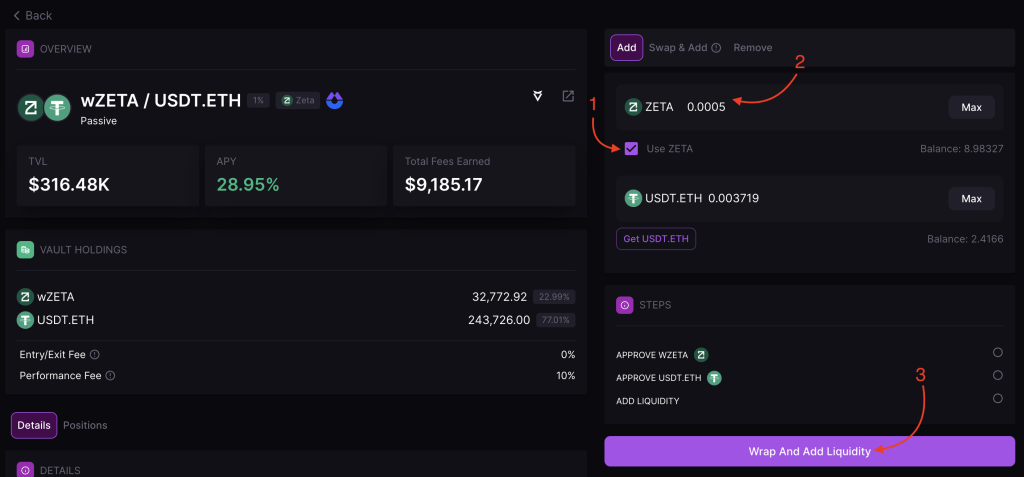
7) Click “Approve / Confirm” twice for wZeta and USDT.ETH. And after approving, click “Confirm” to add your liquidity in your Metamask.
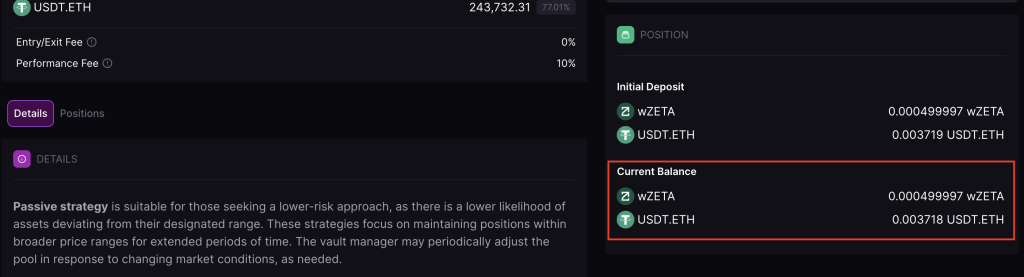
Now if everything is ok, you can see amount of tokens added to liquidity above the form in “POSITION” block:
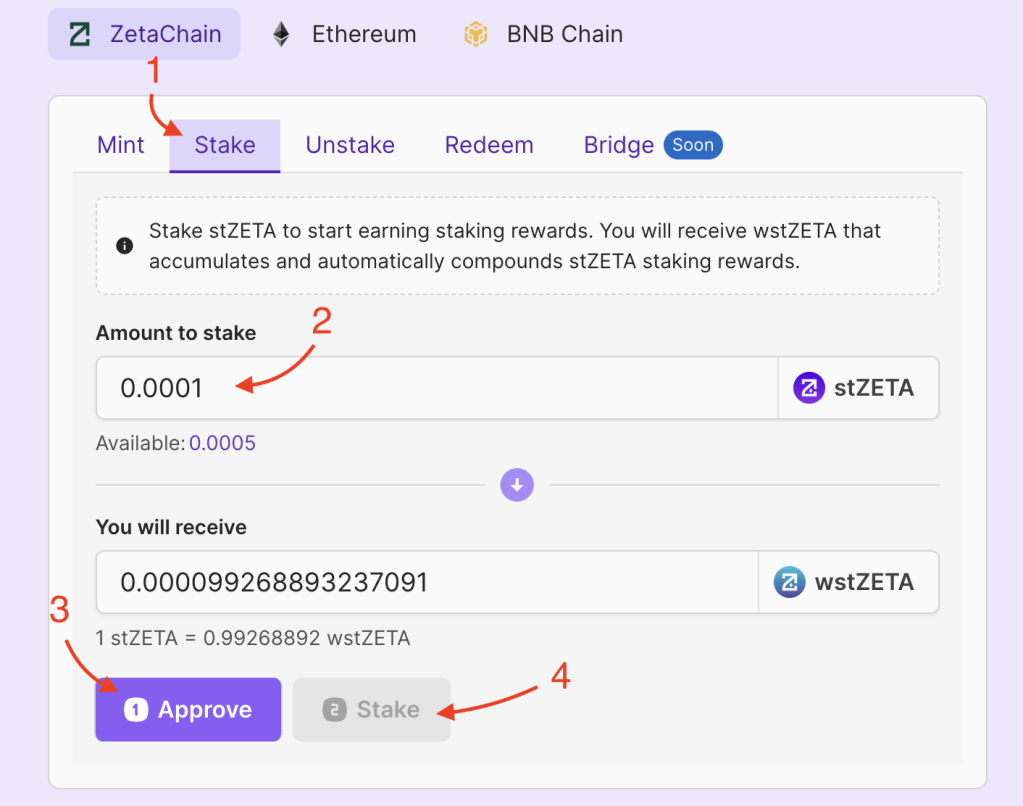
Mint and stake stZETA on Accumulated Finance (Task 9)
1) Go to Accumulated Finance ZetaChain
2) In the upper right corner, click “Connect Wallet” and select the ZetaChain network.
3) Now in “Mint” tab. Enter 0.0005 Zeta into “Amount to mint” field, click on “Mint” button and “Confirm” transaction.

4) After you see the successful completion of the transaction, go to the “Stake” tab.
5) In the field “Amount to stake” enter the part of the tokens you minted, approximately 1/5.
6) Click “Approve” and “Approve” transaction. Then click “Stake” after the button becomes active and click “Confirm” transaction in your wallet.
Points Claiming
Now that all the tasks have been successfully completed, it’s time to collect our XP points. To do this, go here and click on the green “Refresh activities” button. If the task has been successfully credited, its background will change to green, and the “Claim XP” lime link will appear to the right of it instead of “Try”.
Here is an example:

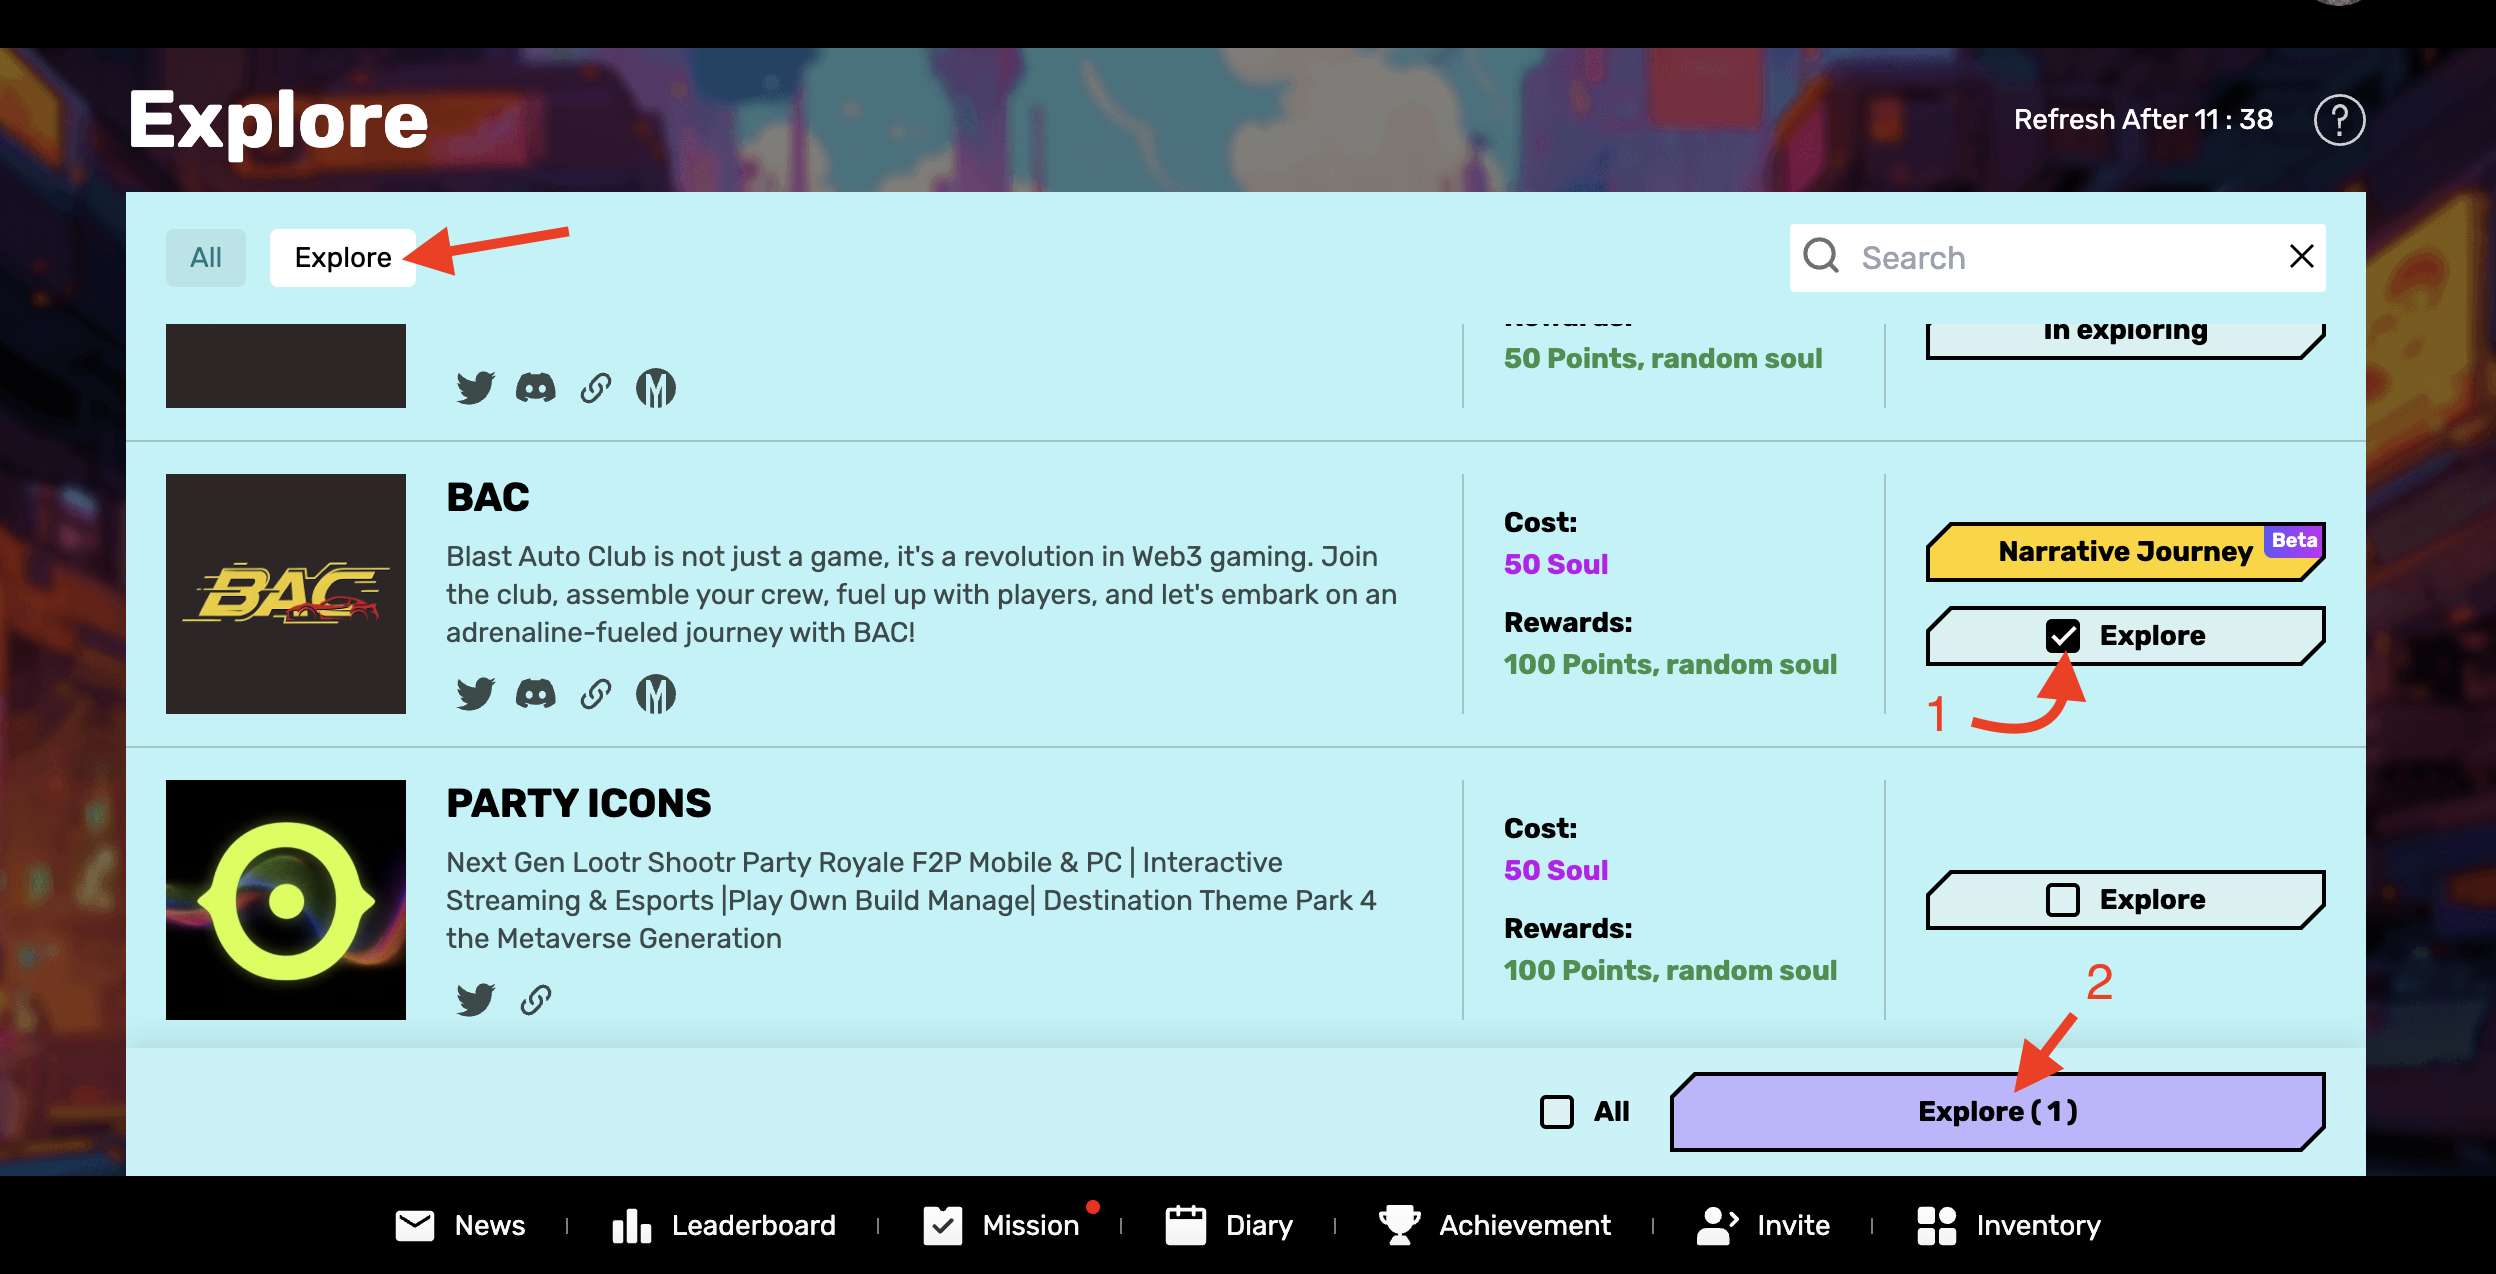
“Explore” any ZetaChain network event on Ultiverse
- Visit Ultiverse explores
- Click on [Explore] checkbox under one of the available projects in the list
- Click on [Explore (1)] button and Confirm transaction in your wallet
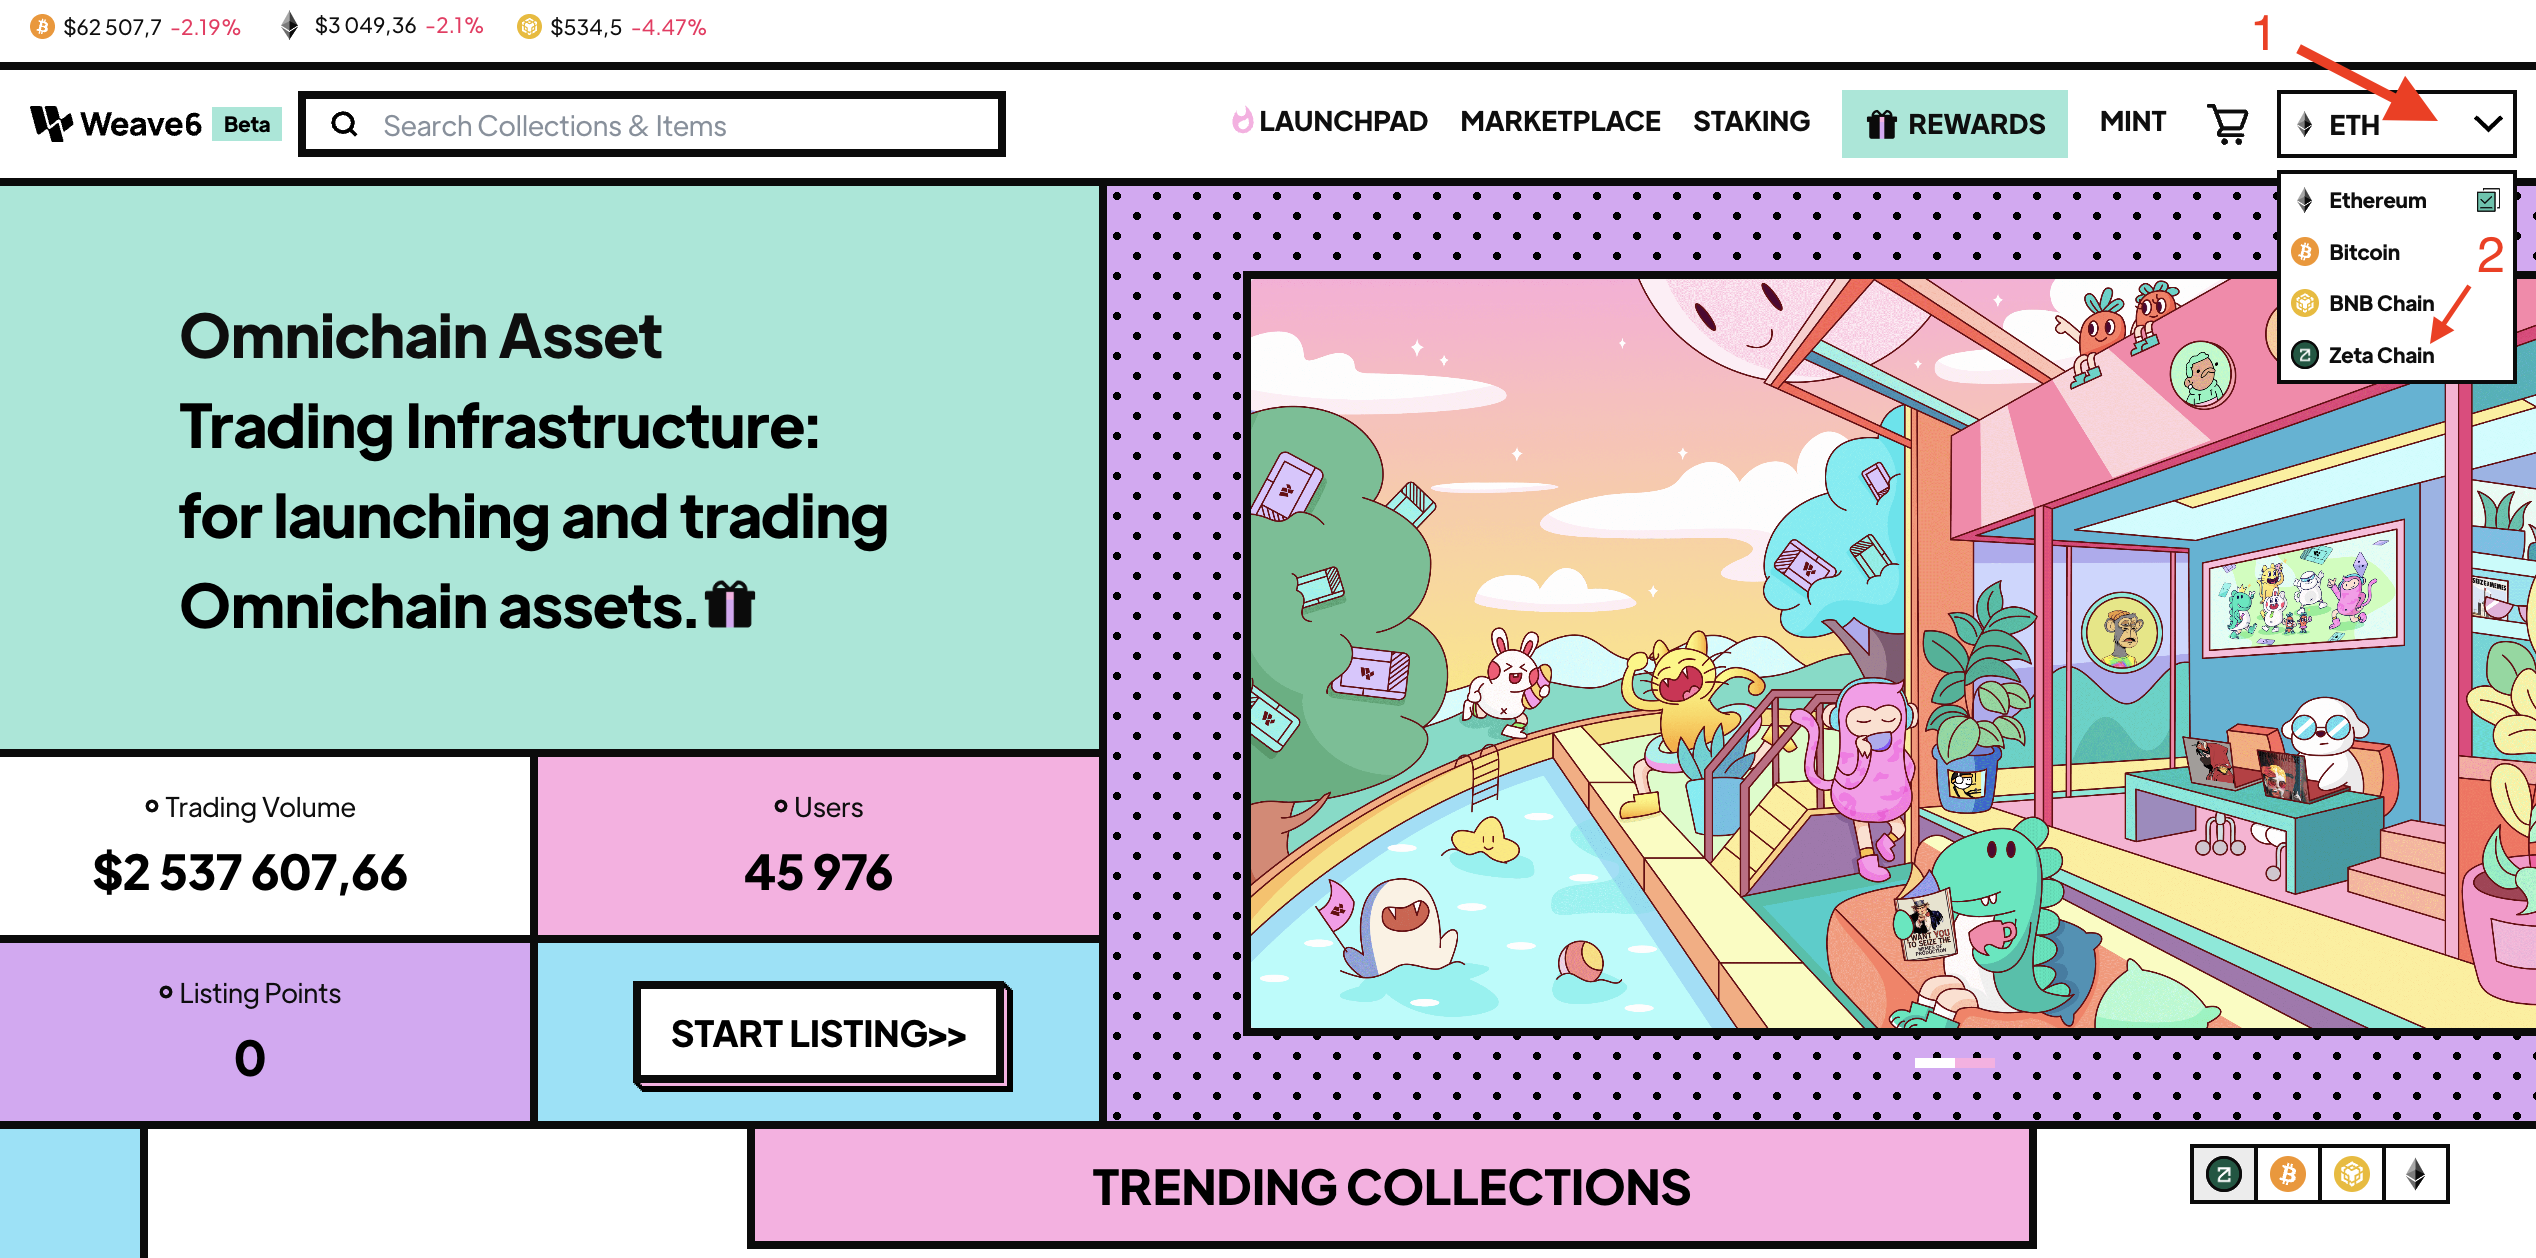
Buy or Sell an NFT on ZetaChain with Weave6
- Go to Weave6 and click [Connect Wallet] in top right corner and sign transaction.
- In opened [Verify Address] popup click [OK] and sign transaction (If the window does not disappear then reload the page).
- Then hover your cursor over ETH selector and click on [Zeta Chain] to switch network to ZetaChain in your wallet and on the weave6 in one moment.
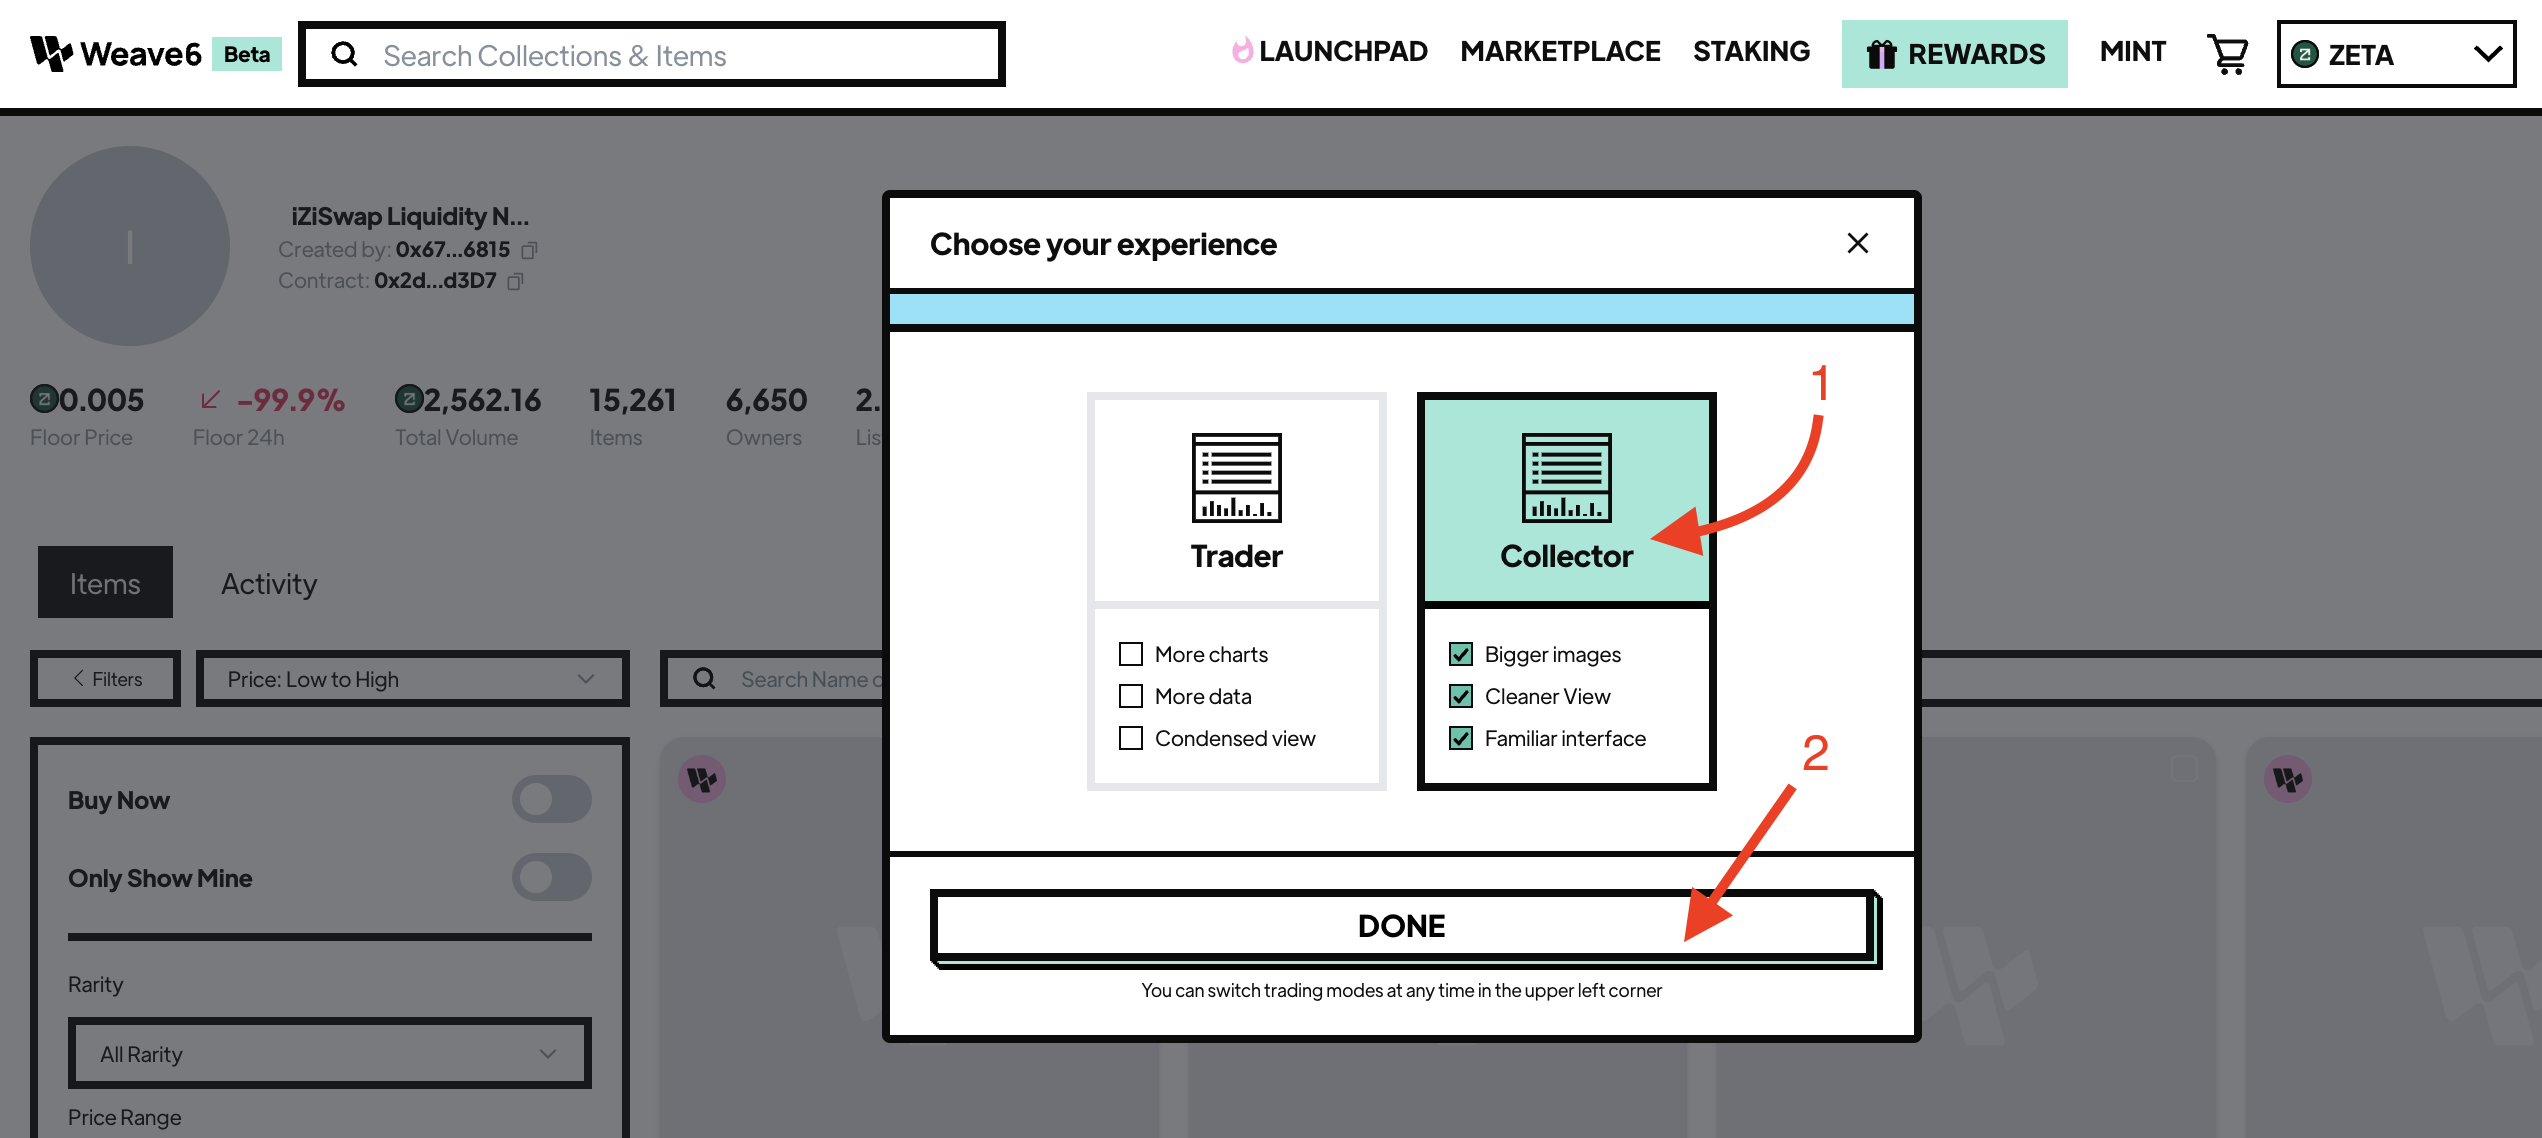
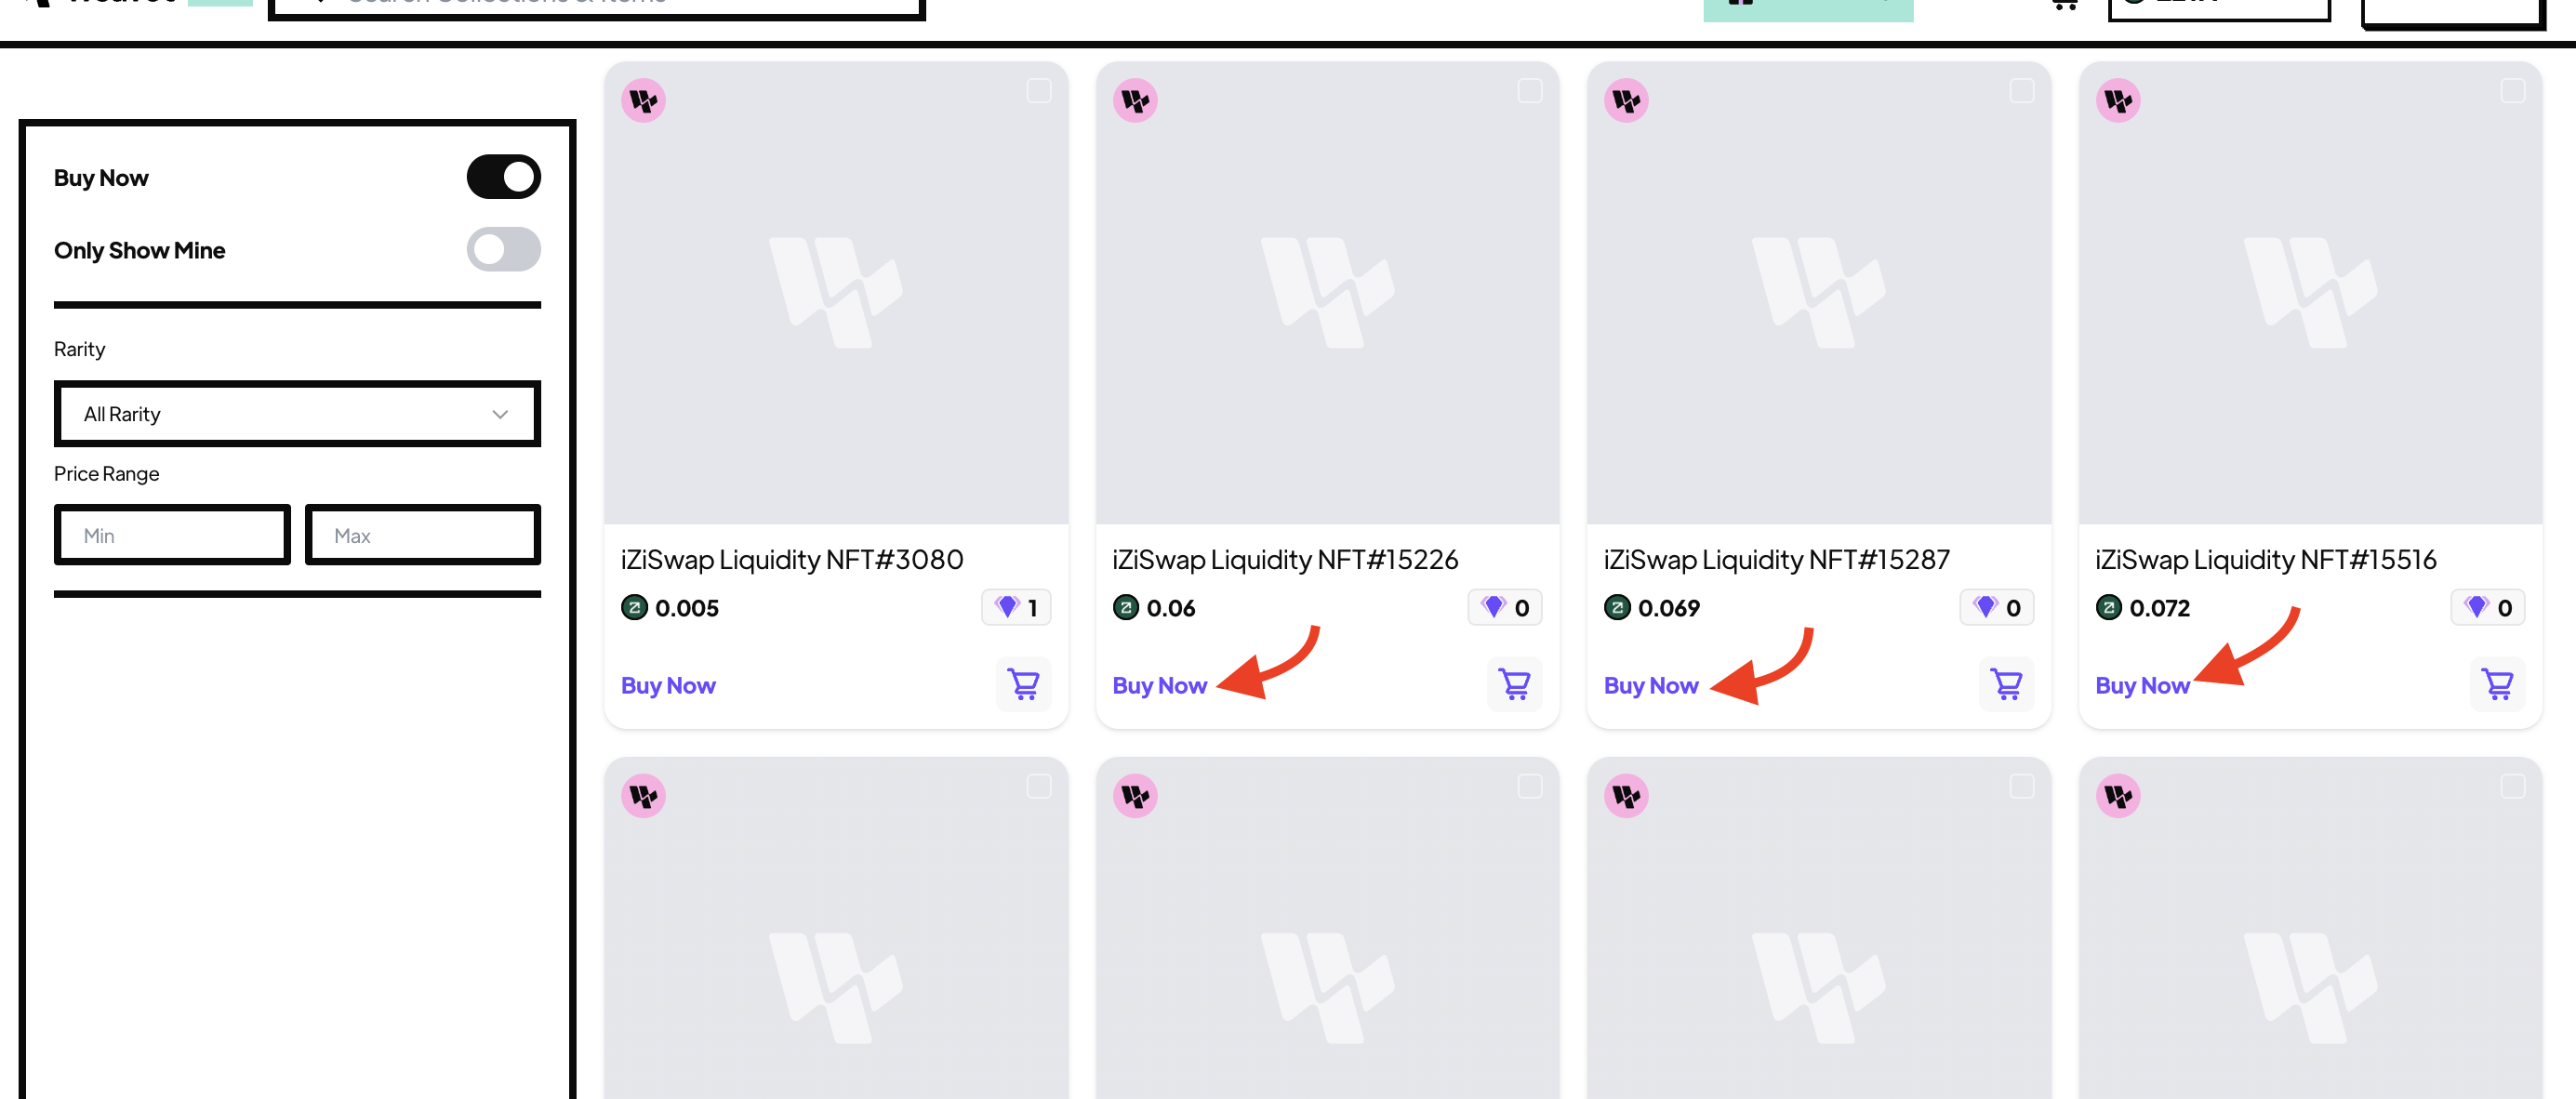
- Next, go to iZiSwap Liquidity NFT collection (Here it the lowest floor price for this moment April 16)
- In opened popup click on [Collector] interface type and click [DONE]
- Next we need apply filters. Select the [Price: Low to High] filter and activate the checkbox for the [Buy Now] filter to show NFTs without auction.
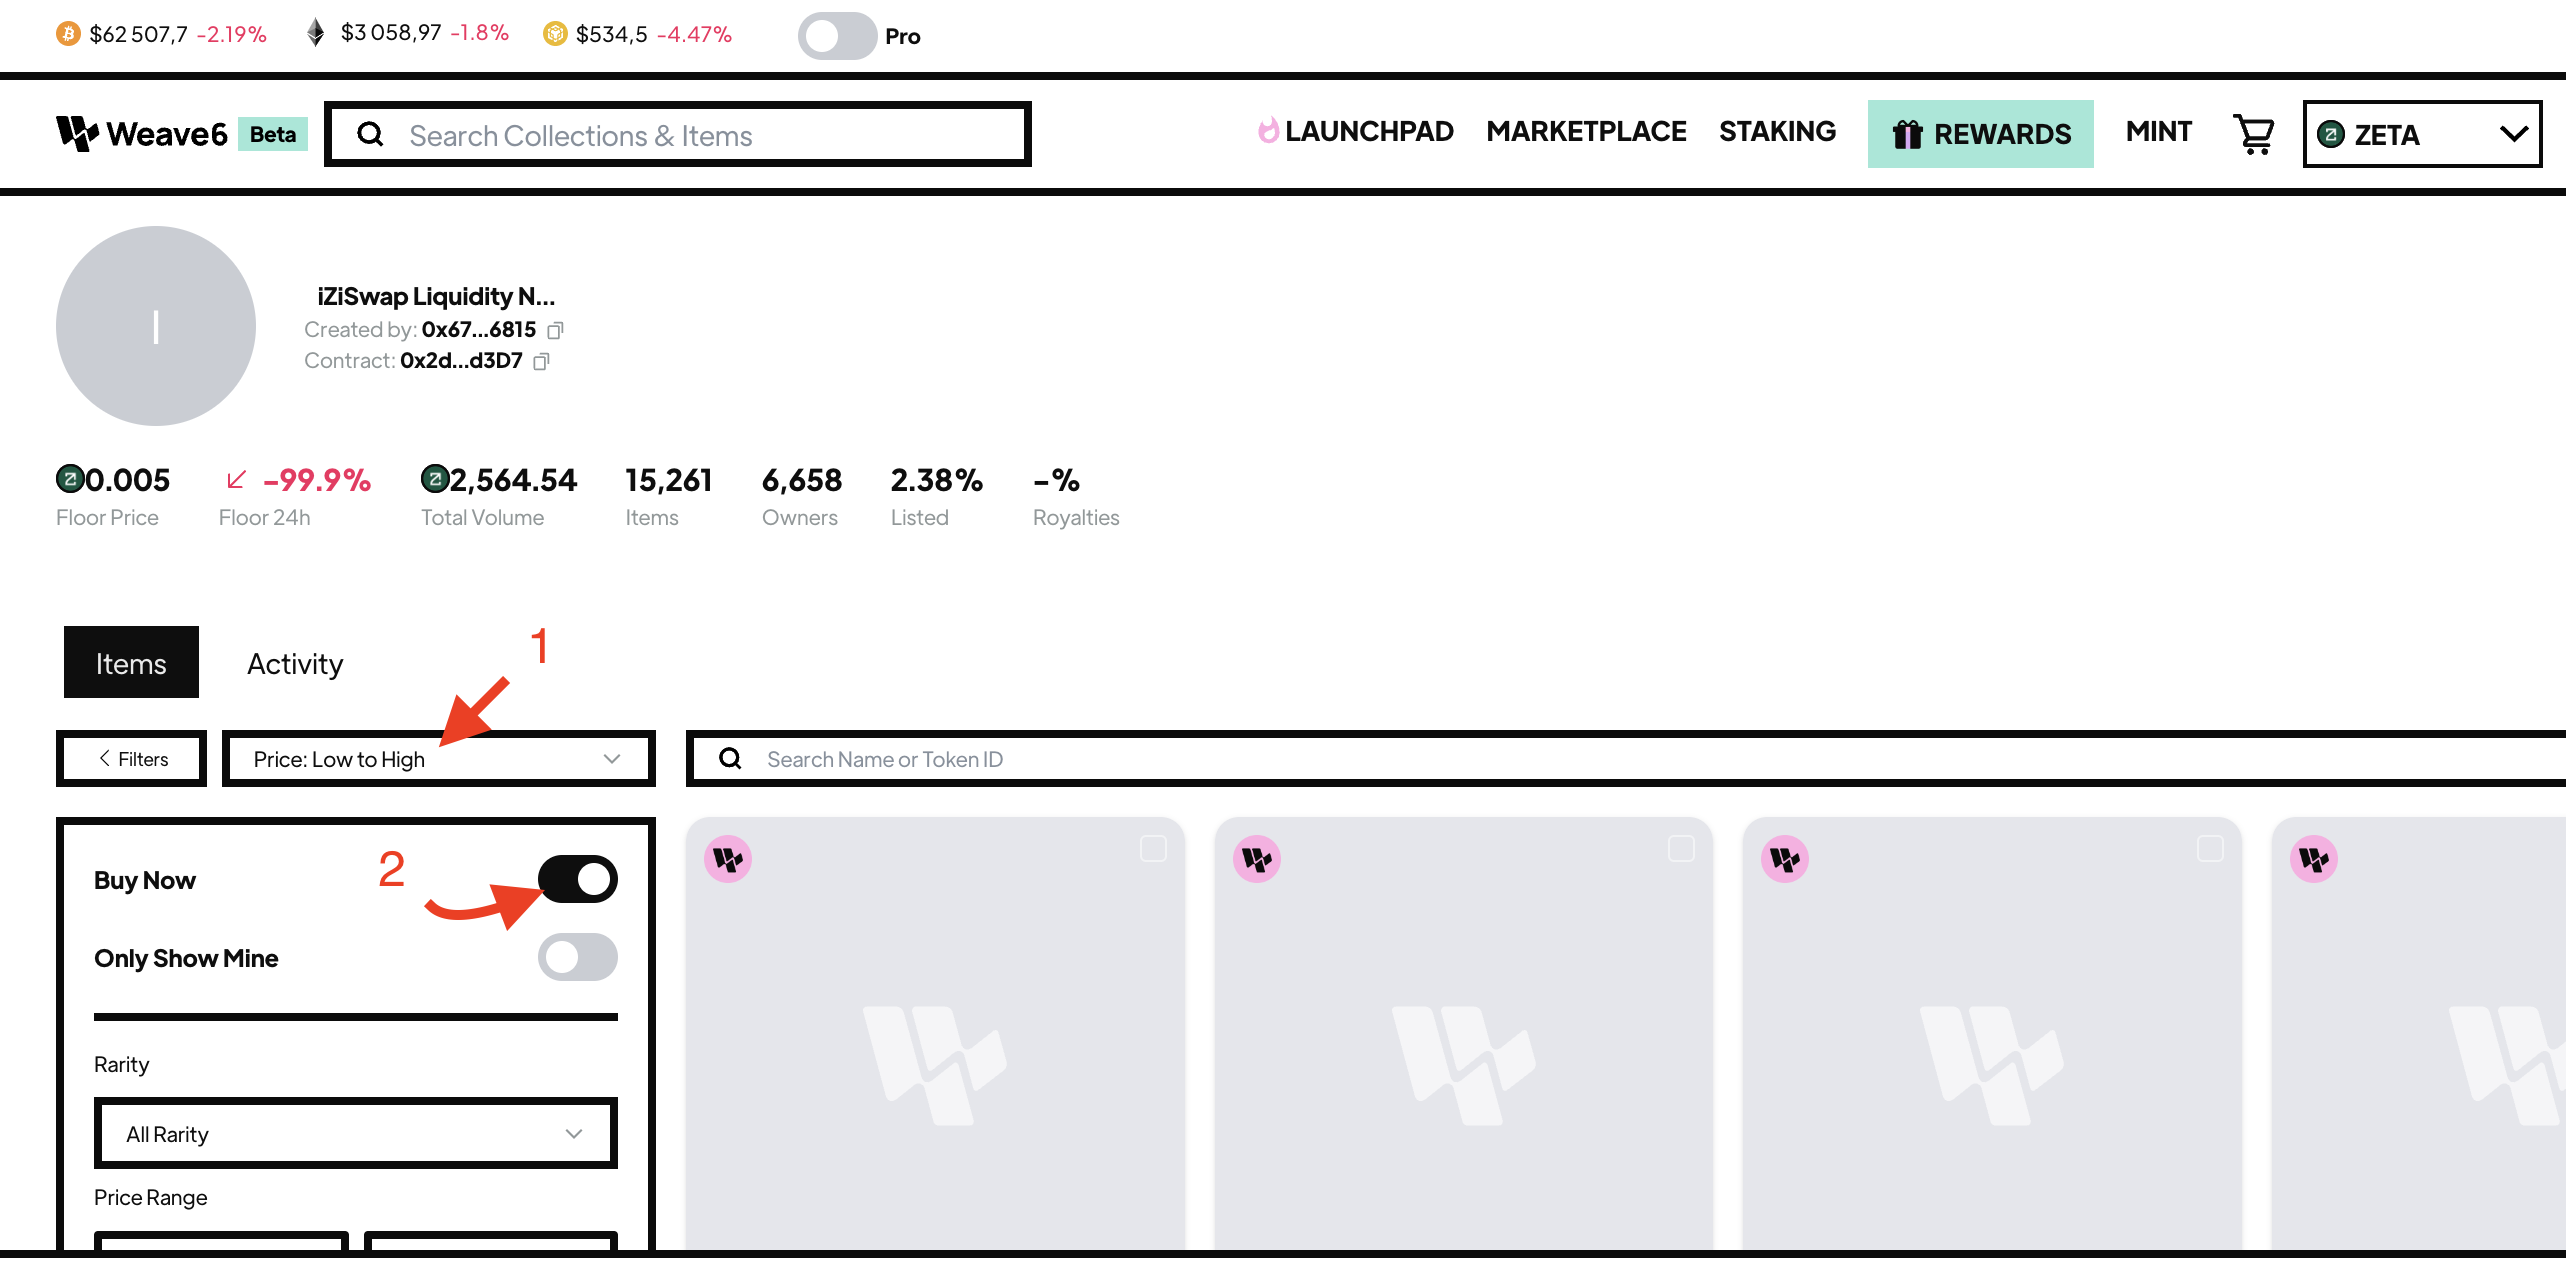
- Scroll down and click on [Buy Now] on NFT card section and in opened popup click on [Complete purchase] and Sign transaction (Pay attention: Some NFTs can’t be purchased on such marketplaces, and this is normal. Therefore if after clicking on Complete purchase the loader works for a long time, just close this window and look for the next NFT)
If everything is okay, the transaction will be initiated and you will need to confirm it in your wallet.
Return back to Zetahub and click [Refresh Activities]. But the task isn’t accepted immediately, you need to wait some time.
Conclusion
The tasks are performed very quickly indeed. The first time you run it, it may take you a little longer. But the subsequent execution will be fast. Also, given the low fees, this is a very cheap activity that you should not miss.
This event was supposed to run for only 30 days, but due to problems with the blockchain during the launch, they extended the campaign for another 90 days. Therefore, now is the time to take part in the event so that you don’t catch FOMO later.
Have a nice day, fat crypto airdrops.
But as always, DYOR.
Enjoyed this article?
Click the like button below to show your support and let us know you found it helpful! Your feedback keeps us motivated to create more content like this.